Monday, April 25, 2011

Jet Pack? No sir...STEAM Pack!

My next project is a piece that is part of a theme environment.  In this case, it's a home theater.  I have already designed much of the room and have several pieces to complete, but thought this one would be a great place to start. 
The concept for the Theater is a Jules Verne inspired airship named "The Aeronaut".  I'll post more about the theater soon, but we'll start with the emergency "escape packs" which allow guests a quick escape method should the airship meet with some form of destruction.
These "escape packs" allow guests aboard to fly from the airship to the ground- and even incorporate a pair of back-up parachutes should the steam run out at a bad time.
I have no doubt some elements of the design will change as I progress. The drawing is a guide, but I try to keep it a somewhat loose one.  The process of building objects like this always seems to present ideas along the way that improve upon this initial sketch.

Saturday, April 23, 2011

Launch!

Finishing a project like this is kind of like Christmas..only in reverse.  You see, I've always enjoyed ripping the layers of paper off of presents to find out what was beneath.  But with projects like this, it's the layers of paint that I'm adding that reveal what it's finally going to look like. With each new layer I get a little more of the picture and a little more excited.
I finished the project on Thursday- but with the the gray skies and rain, I just couldn't bring myself to take any pictures. I really thought this thing needed to be outside to be appreciated.
Finally..today a bit of good luck and the sun is up and it's awesome outside.
I hope you enjoy the pictures, although it's really something to see in person!


Here's another pic of the moon...this one taken inside. The sun seemed to blow out some of the color.


Tuesday, April 19, 2011

Dad, what is that noise?

A quick update...my daughter joined me again in the shop to do some painting while I worked on the rocket.  I had no idea I was doing anything until my daughter said, "Dad, what is that noise?".  I then realized that I had been making the sound of the rocket engines firing while I was painting.  I stopped for a bit and then as soon as I'd back up to look at the paint on the rocket from a distance, I'd automatically start making it again.  As far as I can tell, building a rocket will automatically turn you into a 9 year old.  I don't mind a bit.

Monday, April 18, 2011

Sometimes the Planets Align...

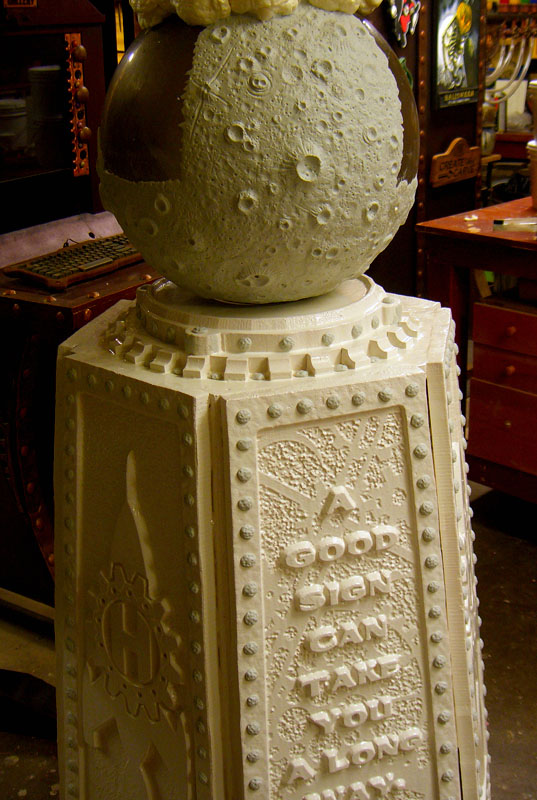
I'm finally putting paint on this project! First, though, I had a few last details to finish- including a minor change I decided to make to the pedestal.  As I installed the rods between the panels, I thought they needed something on top.  I played around with a couple ideas and decided that I had so much fun sculpting a moon that I'd do several little planets.


Each one has a different texture and will be painted in a unique color. 
Next, I put some additional "victorian/steampunk" details on the rocket, just to put it over the top.
This was another place where I used a home-made mold.  I found a great piece left over from a
home-made arcade I built (www.frankencade.blogspot.com) and knew that it's arched shape would
translate into wrapping around the base of the rocket legs really well. I was right.


Now, the last pieces to attach to the pedestal are the planets and a decorative element that will go under each of the "quote" panels.  These got a base coat of copper, and will get much more in terms of glazing and detailing.
Then, it was finally time to start painting the rocket.  I've been looking forward to this since the day CarveWright released the 3d model import software. I knew from the first day I wanted to build a rocket...and I had one like this in mind.  The first layers of paint are always confusing for some because
it looks nothing like it will in the end.  This base coat is an under layer for lots of other colors to come.
Updates will speed up now and I sprint to the end of this totally fun project.


Tuesday, April 12, 2011

Riveting details

It's not always easy finding ways to let children be a part of what you do...but I've allowed my daughter into my shop since she was very little.  I've taught her to be cautious when necessary and when she can simply have fun. This weekend she asked if she could help with the Rocket Sign project and I readily said "YES!".  I had calculated that the pedestal was going to require about 500 rivets and knew exactly how to involve her in the process.  I know some of you may think "Why doesn't he just have the rivets be a part of the carving and save himself the time?" It's a good question, and one that gets to the heart of what I'm trying to do to give my signs life and make them unique.  If I had the machine carve them, they would be perfect..every time.  That's not what I want!  I want a random, hand made quality to the signs that will loudly declare to whoever sees them that they were touched by a human hand and are the better for it.

The way I make the rivets is to first mix a batch of Magic Sculpt, then create hundreds of little peanut size balls.  This can be done quickly, and then lets me focus my attention on placement of the rivets without having to think about it.  I showed my daughter what size to make the balls and told her to fill several small containers. She had a great time and told me all about a penguin game she's been playing and why it's so great.  In all too short a time, she had made me more than enough rivet-peanuts to complete the job.


Because I sometimes use a lightweight foam product for signs, I have to give it a primer coat, and then a hard shell resin coating for protection.  In this case, all the panels on the pedestal needed a coat, which I gave them.  Once that was dry and hard, I could begin adding the rivets.  I push them into a dome shape and then with a small round tool, I indent them randomly to look hand hammered.

I continue to sculpt the last few sections of moon and this afternoon I'll have it done.  I've learned so much just sculpting craters.  It's fun to look at reference photos and then combine that with my own vision of what kind of details would look good for this moon.  I couldn't help but remember the old "Bob Ross" painting shows that used to be on as I added more and more craters. I imagined Bob saying "A happy little crater lives right over here...it's your sign, let that crater live wherever you want!"
I also started putting on a few last little details on the rocket.  I don't want to give them all away yet, but I thought I'd let you see my use of some "found items" for the landing feet.  CarveWright owners will be able to identify at least part of the assembly.

Sunday, April 10, 2011

What a blast...

I thought I'd start off today by sharing one of the things I've been playing with....it's called "Amazing Mold Putty".  It's a two part product that you mix together and you can "smoosh" it over a texture/shape/object you like and make your own custom mold.  Now, in many cases, I'd rather sculpt my own details- but every so often I see something and think "A-ha! I know the center of that coat hook would make a cool space-ship hatch!" or "Hey! That knob would be a pretty neat spaceship viewing portal!"  This product is fun because it only takes about 15 minutes for the putty to solidify enough to make a mold.  After that, I put in a little baby powder, and mix up a batch of magic sculpt.  I let it sit for about an hour to harden just a bit and then I pull my new piece out.  In the case of the rocket ship, I then gently formed the piece onto the hull and added all my own other details.  Eventually, I'll build a nice little collection of textures and shapes that I can use.


Today I spent most of the day enjoying the weather with my daughter and doing battle with bubbles.  I don't know who won- I suppose both of us.  Eventually she moved on to other adventures with a friend, and I snuck into the shop to sculpt a moon.

I decided to work on the bottom first, so that I could get enough done to turn it over and work on the rest of it "right side up".  Once I got what I felt was enough done, I put it back on the pedestal and decided to "rough in" my spaceship exhaust.  To save a little Magic Sculpt, I decided to use the insulation "spray foam" you can get at the local hardware store.  I carefully and strategically applied it to make up the "smoke" portion of my spaceship launch. The remainder of the steel bar will be coated with magic sculpt and utimately painted to look like hot exhaust.  Once this all dries, I can complete the moon and sculpt over the foam smoke.  I'm in the home stretch on the fabrication for this project and I've been thinking real hard about the paint.  What do you think about a red moon?

Saturday, April 9, 2011

Add 1 pound of Magic...

I completed all the panels for the pedestal and they have now been trimmed and attached to the base.  My "rocket-logo" is on 3 sides, while each of the others has a different quote.  These will get a coat of primer to add additional texture and I'll add some rivets on the outer edge of each frame by hand.  I designed these with the size of the CarveWright in mind. The bottoms are  just under 14" wide and they are about 36" tall.  My goal with machines (heck, everything!) is to push it to the limits to take advantage of what it can do and then use the limitations as an opportunity to try to be creative.


I also got to spend an hour or so sculpting the rocketship.  I'm trying to combine some of the retro feel with this rocket and a little steampunk thrown in for fun.  The model I carved is a fantastic base for sculpting with Magic Sculpt epoxy resin.  It didn't take that much for this thing to start really looking like something.  I worked my way from the top to the bottom, mixing batches of resin as needed.

Close inspection of the first photo may reveal a tribute to a good friend.  This rocket has a bit more work, which I can easily wrap up tomorrow and then I finally get to start on that moon! I can't wait. 


Tuesday, April 5, 2011

We are go for liftoff...

My good friend Dan suggested it was time to get a journal up and running to showcase how I'm going about the business of making theme signs and environments.  I agree.

The first project I'll be talking about is a display item for my business. Actually, it's serving two purposes. 1. A sample I can use to show my capabilities 2. An explanatory piece I'll be using to show some of my techniques at an upcoming CarveWright conference.

For those of you who don't know, CarveWright is a fantastic entry level CNC machine that has opened my eyes and allowed me to begin to express my creativity and bring my crazy and fun ideas to reality.  Someday I'll own a larger CNC machine and I'm already sketching and dreaming about what I'll do with one- but in the meantime, I hope you'll enjoy what I'm doing with this versatile little workhorse.

One of the cool pieces of software that you can add to your CarveWright package is the ability to import 3D objects.  You can then prepare them for carving on the machine, and once carved assemble them into the object you imported.  You can take this:


 It gets sliced into pieces the machine can carve, then re-assembled into the object at whatever scale I like.


This is just the beginning...this rocket (which is about 22" long) will be launching from a moon, which will rest upon a large 3' high pedestal...one panel carved, 5 more to go!