Wednesday, January 30, 2013

Put One Foot In Front Of The Other...

Between a mural and preperations for a 3 sign project,  I had a chance to work on R2's feet. They are actually "shells" that will fit over a wooden frame that holds the wheels and all the weight of R2.  They were cut out of sheet pvc (Azek and a thinner product) then assembled.


It took a little spot filler and primer and now they can be painted.

Next, I took a 3D model of the pieces of the "ankle" that is just above the feet.  I found some 1 1/2" HDU scrap and started carving:


Once I carved the other side, and put them together...I could paint it and test fit it on the bottom of the leg.
It's coming together pretty well.

After a quick trip to the store, I found another needed item: Braided hose. You see, R2 has 4 braided wire hoses that run from his feet (2 on each) to some boxes on the inside of his legs.  I found 4 of them 16" long and I'll cut 2-3 inches off of each. I gave them a coat of a bronze paint to get them to the right color.


I have a few more small pieces to carve for the feet details, then I can start to assemble the lower body.  It's coming together quickly now!


Wednesday, January 23, 2013

A prime example...

I thought I'd share a couple pictures showing many, but not quite all, of the pieces for R2.  I decided to take a little time last weekend to do some priming and filling on the legs and other parts that needed it.  The legs, in particular, needed lots of little spots cleaned up and some filler and prime work done to make them smooth and clean.  Sanding is certainly not my favorite thing, but when it's needed, I find that getting the best finish you can up front saves a great deal of sanding.

I "spot filled" lots of little indentations and then primed them and painted.  The next big project is really the feet, but I had to spend some time researching how I plan to attach the legs to the body.  I want to make sure it will be solid, and that most of the weight is on the feet, and not on the body.


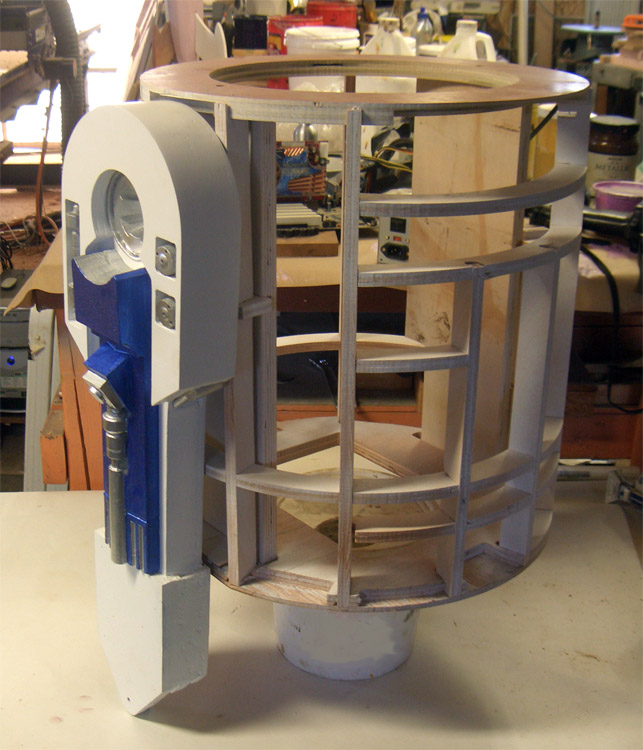
As you can see, I still need to paint and attach one of the octagon ports, and add the blue details to one of the little square pieces in the upper right corner.  It's a lot like building a model kit, except that
I'm building the kit, which I'll then assemble.

Once the feet and all the little attachment pieces and details are done, then I'll work on the shoulder hubs that attach the legs to the body and it will then be time to think about that dome I've been avoiding.    I have several thoughts on how I'll do it, but decided to focus on the rest and save the dome to last.  Why?  Generally I like to deal with the hardest part first, but I already know there are some inexpensive solutions for the dome if necessary. I'd like to take a shot at scratch building it...so it seemed best to focus on all the rest, then return to the dome, knowing I have a backup solution if my own scratch build goes poorly.

Building things like this reminds me of something from when I was pretty young. I watched my brother turn some chunks of wood into Star Trek hand phasers many years ago.  At some point I got my hands on at least one of them...and as kids sometimes do- I hid it somewhere.  I vaguely remember burying it under another kid's porch- but have no recollection of what happened to it.  My brother and another friend (or two?) had staged some Star Trek photos with costumes and home made props.  If he still has those pictures, he's kept them in a secure Al Gore lockbox never to be seen or used as evidence of his past geekery.  I do remember that the idea of making things like that fascinated me.  In those days, the duct tape of  little boys was Testor's glue- a smelly, awful glue that stuck most things together other than the two things you wanted.  Open the lockbox, Haffner....scan those pics for me.


Thursday, January 17, 2013

Re-Do

I've been very busy this week.  I've been working on some designs for a client's website and also have begun a mural in the entry way of a local business.  When I catch a few minutes in the shop at the end of the day, I've been doing some work on R2.

I spent some time this week fixing a couple small problems on the droid.  A fellow R2 builder pointed out that one of my vents was wrong.  I saw that he was right, and re-carved the upper vent.  I also carved the little blue utility arms and some curved pieces that attach to the bottom of the legs.


Today I did some more priming and a little painting.  He's looking more familiar all the time.

I've been thinking about my mistake and the guy who pointed it out.  He was very nice about how he explained the error and showed an example of how it should look. Truthfully, I should have caught it.  In turn, I quickly realized he was right and thanked him for the catch.  I wasted no time fretting over the error, but quickly moved to correct it.  It was a small thing, and many people wouldn't notice that it was wrong, but I wanted it right.  In a very short time, the mistake was corrected and I realized I needed to make sure that each piece I made matched with the original.  I had simply assumed they were both the same.  By checking each piece against the thousands of images online, the chances of a repeat mistake are lowered substantially.  In fact, it could have been something much more challenging to fix.  The mistake will have been useful.  I checked to be sure the two blue utility arms matched before I carved two of them. Potential mistake averted.


I thought back to my previous job and how much effort was spent all around that company trying to hide and/or cover mistakes.  Much of the corporate world is very wasteful and inefficient. I thought about the amount of time put in by many employees (including myself) trying to prove they hadn't made a mistake or that it wasn't their fault.  Worse, entire meetings were dominated by a mistake and processes were built in an attempt to ensure a similar mistake didn't happen.  Whole departments would be given new instructions regularly to add more redundant and often ridiculous processes that would prove we were trying to reduce mistakes.  You see, the corporate world in general sees the formula like this: Mistakes = lost profit.  That formula works...but not always.

Development of something new, or learning a new skill is a different beast.  Once you know how to make a pizza, and have made a few...the number of mistakes should be pretty low. On the other hand, inventing a whole new form of pizza- one that's never existed...not so simple. Mistakes, in this case, are the stepping stones to success.  We learn by practice and repetition.  We come to understand the process that will work. I know that were I to build a second R2D2, there would be fewer mistakes than I've made on this one...and a third unit would likely be even more error free.  Additionally, mistakes sometimes lead to something wonderful.  A mistake while trying to invent Super-Glue led to the invention of the Post-It note.  So my advice is this: Don't be afraid of mistakes. Don't be afraid to own them. I'm not suggesting you go out with the goal of making mistakes, I'm just saying that you have the most potential to learn from them. Use it.


Sunday, January 13, 2013

Time To Vent

I spent some time this weekend on R2. I cleaned up all the edges of the "skin" and attached it to the frame. I also had to do some work on the files for many of the 3D parts needed on his body. There are some things called "Power couplers" and "Octagon" ports as well as the "Vents"...I set up each of those and used various pieces of scrap HDU to cut them out. Some were 1 1/2" others 1" or 1/2". That's why some pieces are grey, some yellow and others a salmon color...all different kinds of HDU I had.

I put them in place just to see how they fit. I'll have to prime and paint each of those before I put them in to stay. I still have to carve a piece called the "Coinslots" as well as the "Coin Returns".  Lastly, the two weird shapes just below the dome on the front.  It seems like I've come a long way- but still plenty to do.


Thursday, January 10, 2013

Fits like a second skin

here is skin #2. This one goes on the one completed earlier.  There are actually several pieces that get cut and glued inside some of the pockets..they are held in with very small tabs right now.


Here is the second skin temporarily taped in place over the inner skin.  Lots of cleanup to do on the edges of this second skin. I'll work on that in the morning.

I'll also carve to two skins for the backside.  If I get a chance, I'll glue up the front and back inner skin as well. In order to hold it all in place during glue up, I'll glue the skin to the frame, and wrap the whole thing tightly with plastic wrap to hold it tightly to the frame while the glue dries.  You can almost start to recognize the little guy from the body alone...

Wednesday, January 9, 2013

More than one way to skin a droid

A great way to put the shell, or skin, on the body of the R2, is to use a pvc or styrene sheet. There are actually 4 sets of skin to carve.  An inner skin and outer skin for the front and back.  They will provide much of the detail on the body, and provide pockets (holes) for additional details.  Here is the inner front skin, freshly cut on the Shopbot


I wanted to make sure everything matched up to the frame before I cut any more- so I've temporarily taped it to the frame to check the fit. Everything looks great! Next I'll cut the back inner skin.  This skin only took about 5 minutes to carve as a profile cut into 1mm pvc.


Tuesday, January 8, 2013

Frame!

One of the basic structures that has to be built for our little droid is the frame for the body. It's the part underneath the dome with all the little doors.  Fortunately, a fellow named Senna has already engineered a nice little frame.  The challenge? The PDF appears to be a scan of the plans.  No vectors. Likewise, an updated set of PDF files had all kinds of dimensions...including vectors, but many of the vectors were open and would not work to create pocket cuts...they are also scaled wrong.  So, the only option other than waiting to see if any of the droid builders would offer their own cnc plans....was to re-vector the original plans.  I spent some time yesterday and then last night completing those.

This morning...I cut out the 20+ parts.  Some were 3/4" and others 1/2". There is one 1/4" piece as well.

In less than 20 minutes, all the pieces were cut out, and ready to assemble:


His little body is ready for some skin!  For now, I need to complete some other work, so R2 will continue tomorrow.  Consider this: In just a few days I've almost completed his legs and now have the frame for his body.  Considering I only work a bit each day on this, it's pretty fast progress!


Monday, January 7, 2013

Weekend Progress

I did get some work completed on the little droid this weekend.  I carved up some parts, and even did a little priming and painting. The legs are getting close to complete.  It's still amazing to me that with a decent 3D model, you can break it into smaller parts, and quickly make it real. 


I decided that it would be worth it to join the R2 Builder's Club, and have submitted an application to the Midwest Robots group on Yahoo Groups (also on facebook) as well.

It's clear that almost everything other than the dome is easily created on a cnc machine.  The dome could be done, but would require much more effort.  If I had a big old indexer/lathe like Dan, I could whip one of those out too....He can handle 18" in diameter easily.  In fact, he could probably carve the whole center body that way...and the legs seperately.  Maybe I better hurry up and turn that extra spindle I have into an indexer.


Friday, January 4, 2013

Testing in Foam

One of the great things about foam (pink or blue) from the local big box store is that it's inexpensive.  It's a great way to test cuts and ensure you have everything right before you commit to more expensive materials.  In this case, I'm working on the center portion of r2's legs.  Its a slightly larger piece, and I wanted to make sure I had it right before I went on to HDU.  I carved it in some pink foam in about 20 minutes....and now I'm carving 2 of them in HDU now that I know everything is looking good.  The legs are coming right along....

Next up: It's time to start thinking about the "ankle" and the "feet".  There are also some shapes that many call "battery boxes" on the bottom....I'll be working out how to do those as well.  In just a couple days, by spending a small amount of my time (the machine spends the most time working on this)...I've almost completed the legs.  It's truly amazing how much you can accomplish if you dedicate a few minutes every day.


Thursday, January 3, 2013

You Aren't Actually Building A Droid? R2.

So the foam "test" for the circular piece in the middle of the leg worked ok...I duplicated it in HDU foam and then set up a file to do some little "detail pieces" that attach to the shoulder area.  I set them up in the carving program:

The circular pieces are just a straight carve. The longer pieces have been split in two and are being carved then reassembled front and back when it's done.  The carving was done in HDU with a 1/8" ball nose bit:

They were assembled with some glue, and then sanded, primed and painted with an aluminum paint. Here they are test fitted into the legs.
It's not huge progress, but part of my "get a little done each day" plan.  I'm having fun! Tomorrow I'll begin the middle portion of the leg...rocket thrusters that we finally saw in action in the newer films.


I Don't Seem To Remember Ever Owning A Droid


One of the truly fun things about doing the variety of work that I'm now doing is that I can have many projects working simultaneously.  I may be working on several different projects all at once.  What I try to do, is make at least one of those projects a challenge to myself..something that will push what I've learned so far, and help me learn new things.  It may be a sample for my business, a gift I intend for someone...or just something I think is too cool not to attempt.

I've had this one in the back of my mind since I first started working with cnc machines.  It turns out there are many many people who have built them in various ways.  Some with plastic, some with aluminum...some with paper mache.  There are plans all over the internet, but many find that the challenge is large if you want it to look decent.

So, this is now one of my side projects. I'll work on it a little bit each day between the jobs I need to finish and begin this year.  It's a project that will force me to think about how to carve and/or create many many pieces.

I began with some work completed by Wes Thierry over at http://westhierry.net/wordpress/
I'm also using a reference model found on Google's 3d warehouse.  In some cases, I'll seperate pieces from that accurate 3D model, and then export them as individual 3D models.  I can import pieces into  my carving program and carve each piece.  In some cases, it'll be far more easy to treat them not as 3D models to carve, but to use the piece as a guide as I build my own files.  The joy of pink foam is that I can make a prototype and discover whether it's working or not before I commit to some other material like PVC or HDU.

I know it's going to be a challenge, but I think it will be fun. I'm excited to get started and I hope you R2.