It's not always easy finding ways to let children be a part of what you do...but I've allowed my daughter into my shop since she was very little. I've taught her to be cautious when necessary and when she can simply have fun. This weekend she asked if she could help with the Rocket Sign project and I readily said "YES!". I had calculated that the pedestal was going to require about 500 rivets and knew exactly how to involve her in the process. I know some of you may think "Why doesn't he just have the rivets be a part of the carving and save himself the time?" It's a good question, and one that gets to the heart of what I'm trying to do to give my signs life and make them unique. If I had the machine carve them, they would be perfect..every time. That's not what I want! I want a random, hand made quality to the signs that will loudly declare to whoever sees them that they were touched by a human hand and are the better for it.
The way I make the rivets is to first mix a batch of Magic Sculpt, then create hundreds of little peanut size balls. This can be done quickly, and then lets me focus my attention on placement of the rivets without having to think about it. I showed my daughter what size to make the balls and told her to fill several small containers. She had a great time and told me all about a penguin game she's been playing and why it's so great. In all too short a time, she had made me more than enough rivet-peanuts to complete the job.
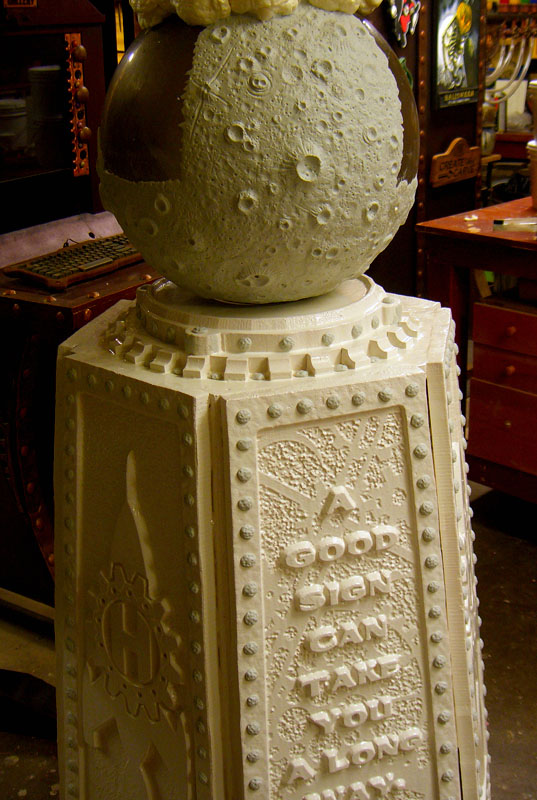
Because I sometimes use a lightweight foam product for signs, I have to give it a primer coat, and then a hard shell resin coating for protection. In this case, all the panels on the pedestal needed a coat, which I gave them. Once that was dry and hard, I could begin adding the rivets. I push them into a dome shape and then with a small round tool, I indent them randomly to look hand hammered.
I continue to sculpt the last few sections of moon and this afternoon I'll have it done. I've learned so much just sculpting craters. It's fun to look at reference photos and then combine that with my own vision of what kind of details would look good for this moon. I couldn't help but remember the old "Bob Ross" painting shows that used to be on as I added more and more craters. I imagined Bob saying "A happy little crater lives right over here...it's your sign, let that crater live wherever you want!"
I also started putting on a few last little details on the rocket. I don't want to give them all away yet, but I thought I'd let you see my use of some "found items" for the landing feet. CarveWright owners will be able to identify at least part of the assembly.


Doug
ReplyDeleteYou are a BAD man. And I mean that in the very best way possible. You have re-inspired me to blast off to new heights in my own creations. It looks to me like I have met my match. Prepare to duel to the death! :)
-grampa dan
The best part of a duel with you, Dan is that somehow I think we both come out winning- but that need not ruin our game! To arms, sir...
ReplyDeleteLOL...here's a thought...a rivet challenge!
ReplyDeleteGreat work Doug.
When I read 500 hand made and "worked" rivets I immediately wondered what Dan would think. Can't wait to see them all rusted up.
And that moon...man-o-man that's one beautifully cratered moon. It's got me thinking of my "Dan Challenge" project. It's still bouncing around in my head and sketch book.
After getting back from the workshop I sketched out a really rough idea of a crescent moon with a shooting star arching from point to point and a bulbousy looking light-up rocket of some sort in the middle. "Shoot the Moon Productions" But seeing this moon is making me think think think. :)
I a good way ;) WOW!
Keep it up, can't wait to see the finished product.
Ryan
Doug...I've been meaning to ask. How long does it take your CarveWright to cut...for example...the panel with the quote on it?
ReplyDeleteAnd does it automatically move the sheet back and forth or do you have to do the manually?
Ryan
Great questions, Ryan. The CarveWright would normally take about 4 hours per panel (like the one's with the quotes). With a special bit and software that may or may not be pending (how's that for vague)it would be about an hour and a half. The machine moves the piece-and depending on the style of carve either back and forth, or one way. I've come to realize that no matter how large a machine I someday own, this will always be around. It's just so easy to use on these kinds of projects.
ReplyDeleteWhat is the special software and bit? Sounds like it could improve time for carvings for the rest of us.
ReplyDeleteThe CarveWright now has a 3/16" roundover bit available to do these carves more quickly...like I did here. The software is part of the latest "Designer" software that comes with it.
ReplyDelete