From the beginning of the fish challenge, well..technically before the challenge...I had an idea. The creation of uv invisible blacklight paint has intrigued me. I saw some amazing work from an artist named Tang Dong Bai who works in airbrush and has moved to Pontiac, Illinois.
The paint is almost invisible in regular daylight...in fact several colors are completely invisible...until you turn on a blacklight. In the following picture, these dresses are totally white under regular light.
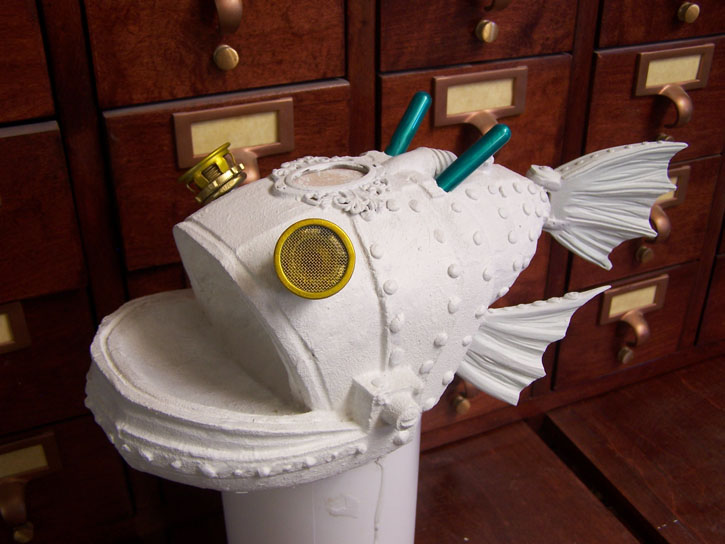
As soon as I saw them, I thought it would be amazing to include them in some way into signs. The paint isn't really usable outdoors yet, but eventually! In the meantime how could I use them on a sample? I thought about how amazing those deep sea fish look...and then remembered a steampunk sign I'd seen of Jamie Oxenham's. The challenge formulated in my mind immediately. The paint would be my ace in the hole.
Unfortunately, the blacklight LED strip will not arrive until late August. I decided that it was time to share the plan...it has been too hard to hold it in.
Once the strip arrives, I'll add it to the 'tank'. Goodness, I'll have trouble counting how many LEDs will be in this sample! It'll be lit two ways..one for regular viewing, and one for in the dark of the tank.
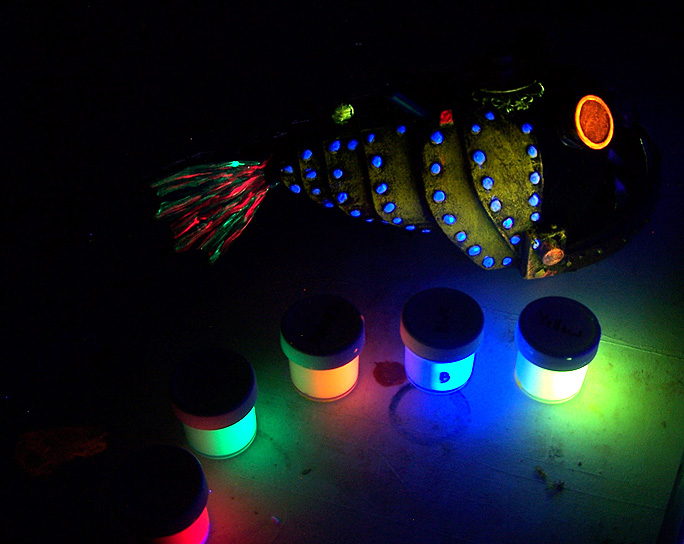
The paints arrived just a couple days ago. They are called "Wildfire" blacklight UV paint..and are actually a spin-off of Modern Masters.
They are pretty cool. They look a little like elmer's glue until they dry....then they are barely visible.
Some are totally invisible. The work is going to be playing with them in paint. You can mix them with water based acrylics and get totally different colors.
In the following photo, the tail and eye haven't quite dried..so you can see some white. I decided to paint on the "back side" that is not as visible as the other side. It's a test, and I can always uv clear over it and try again....
But what does it look like under blacklight?
I clearly need some experience painting with the colors..but this is going to be fun. Not just fun for this fish challenge, but pure fun. Stay tuned!
Tuesday, July 30, 2013
Sunday, July 28, 2013
A little bit each day and a lot.
This weekend has been a great deal of fun. I had to "cowboy up" and start carving the Rhino 2-sided sign. I finished the one for the wall a while ago and now it was time to ensure all the measurements were correct and go for it. My mild fear came from the fact that a 2" sheet of 30lb. HDU is really expensive. Any screw up would be very very expensive for me. I'd test cut some pvc, and even a full version in pink foam. It simply was time to get going and prove I'd done all the homework properly.
I put the first piece on and started it up:
Things went well. In order to get to the correct shape, there were many toolpaths and several bit changes. It took many hours to get them both completed, but the result was worth it:
Now here's the thing. The carves are two sided for both pieces. The client brought a 1/4" piece of steel that had been pre-cut to fit in the center. There are tabs that will be connected to chains which will hold the sign in it's diamond shape. It's a pretty cool piece, but I'll be honest...the holes weren't 100% in terms of being equally spaced. Not a big deal, but it added a bit of adjustment on the cut files. A pocket was cut on the back of each piece, and a space for the tabs.
In the end- they came out great and fit with the steel like a glove.
It will be pretty heavy when completed! I wouldn't want to be the kid who decides to give it a kick, I'll tell you that!
Now it's on to primer and paint...and I love that part the most!
Additionally, while all this carving was going on- I began some paint work on the fish for my mechanical fish institute sample...a little bit each day will get it done!
Monday, July 22, 2013
here subby sub sub
One more quick post this evening.....I had a chance to put the dangly light on the fish. It still needs the "cage" around the light, but we're in good shape so far. Soon there will be paint and nasty nasty submarine tearing teeth.
It's just about time for some of that paint. It's almost time to share another bit of the surprise that I've kept in the dark....soon...very soon.
Eye Like You
I didn't have a great deal of time to put on the mechanical fish this weekend, but I did get some work completed. I managed to get some sculpting completed, and after a bit of a hunt for a power supply, I was able to get my eye lights and little green light working.
I must admit to being challenged in the area of custom wiring...and need to talk my buddy Mark Smart into a weekend or couple of days dipping my head into resistors, milli-amps and voltage.
Here is the currently toothless beast with no lights...
Here he is with lights:
I have not yet attached the portion of his "dangling bait" light....
I've also been at work cutting the final portions of the two sided Rhino sign and making sure all will fit well with those...I should have pictures very soon! In addition- the client brought some pieces already cut in wood by another person..and I just couldn't discard them. They'll look great inside his building somewhere..they just needed some paint love:
In the meantime, I don't want to scare anyone- but let me share this:
http://www.youtube.com/watch?v=VUUSdvwEC_Y
Thursday, July 18, 2013
Back In The Groove
Over the next few days, I'm carving some additional Rhino pieces, carving some Rock Island Trail signs and some football helmet signs for the local stadium...whew!
I cleaned the shop today and my helper, Shannon Ingles, got some more paint moving.
The Mechanical Fish is moving quickly, now that I'm back:
The gold is just the first color to be applied to the port hole....the bottom section has some sweet rust on all the rivets. Many more layers of color will be added to the top.
I also picked up some special LEDs for the eyes of the fish and his "bait" light.
Check back soon!
Subscribe to:
Posts (Atom)